I'm excited to say that this post has been featured at Whipup!
Able to leap over (and pick up) a room full of toys in a single bound, faster than a speeding toddler, stronger (willed) than a preschooler, it's...supermom. Well, we can pretend. I hated to throw away the collar and cuffs that I cut off of the ($1) xxl shirt I used to make this, but they make good dress up props while I'm thinking of what I'm really going to use them for.
This is my first tutorial, and you will probably have to have a little bit of sewing knowledge to follow some of it. My mom taught me to sew when I was in school and we made wool suits, but until recently I wouldn't have tried to figure out how to make something like this without a pattern. After spending some time on blogs online I'm feeling a little braver about improvising. So I hope you will get some ideas from this about how to do some improvising of your own.
First I cut off the sleeves and shoulders while the shirt was inside out.
Cut off the cuffs and down the underarm seem.
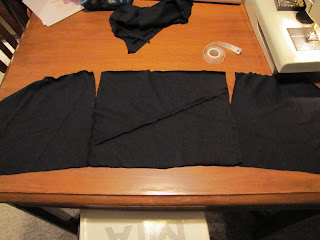
I knew I wanted to gather a bit at the top of the skirt, so I drew straight chalk line from the top to the bottom of the sides (note: shirt is inside out and folded in half for uniform sides). I made sure when I cut the sides off I ended my cut tapered off above the hem so I wouldn't have a bunch of bulk there later. I don't look good in a tent though, so I should have made the top of the shirt more narrow with a greater angle (had to fix it later). I would suggest making the top a couple inches bigger than your rib cage, curve through a couple inches more than your waste and on to the outside bottom corner of the shirt. (Remember you will need to divide circumference by 4 if you have your shirt laid out like I do).
Here are my dimensions for the front. Cut out 2. I measured from my shoulder to under my bust at my armpit. If you want your waist band to hit a little lower than mine, make sure and measure vertically through the largest part of your bust.
I cut this part from my sleeves. I barely had enough material. Or you could use a second shirt.
Turn one of the sleeve leftovers over so they are stacked like this.
Then, cut off the extra and pin and stitch.
Open it up and cut out 1 back rectangle. It should be the same height as your front pieces and as wide as your shoulders. (You should probably have someone else take this measurement. I didn't and couldn't straighten my shoulders at the same time and ended up having to add some fabric later.
Sew fronts to back at sides from bottom to 4" up with right side together. I'm not sure if this is a universal measurement. You should measure from your armpit to the bottom of your bra line to see what your measurement should be.
Baste top of front pieces as well as 1/4 to 1/2 in on bottom. (The bottom of my front pieces was 18" so I measured in to 4 1/2" and 9" and basted between those points.)
Measure in 4" on both sides of your back and mark.
Gather front shoulders to match marked points on back and stitch with right sides together. Then try it on and play around with the gathers at the bust and overlapping the flaps so it fits right. I folded my inside points over at this point as you can see. I could have just cut it off, but I liked the way it looked and thought it might add some stability.
Sew up the sides of your skirt piece and baste the front and them the back (so you can adjust from both sides). With the skirt inside out and the top right side out, slide the top into the skirt so the waist is even. Gather the skirt to match the top, pin and stitch with a zig zag (It doesn't have to be a big zig zag, but you have to allow for some give so you don't bust the thread when you put your dress on. It's okay if the basting busts after you have it all put together though).
Turn the whole dress right side out and shirr. If you aren't familiar with shirring (your are missing out) here's a tutorial! I used my presser foot as a guide to space my stitching.
Here is my dress after I shirred and discovered it was too tent-like. You can see the chalk line that I sewed over and then folded the dress in half vertically and cut off the excess and sewed up the other side.
And here you can see where I fixed my mistake of too narrow of a back piece.
We've waited until this point to cut out the curve of the arm wholes because I was worried about cutting too much out at the sacrifice of modesty. But the arms are awkward without the curve so wiggle into your dress and fold your material around until you figure out how much to cut out. I only cut the front because my "fixing" made a natural curve in the back, but you will probably be most comfortable if you cut both sides. Don't cut through your stitching lines though or your seems will pull apart.
Ta da! Okay, I'm not completely comfortable with this picture, but it was the least embarrassing. Very comfy dress!!


1 comment:
Looks great! Thanks so much for linking to Thrifty Thursday! :)
Post a Comment