Pages

Tuesday, October 25, 2011

The Birthday Jumper

I'm so excited about this!
You should see it on little miss Z...except she isn't nearly as excited about it as I am...even though she picked it out.  This is not the material I would have picked for a birthday tea party frock, but it's cute.  She'll wear it with a black turtle neck and black tights.
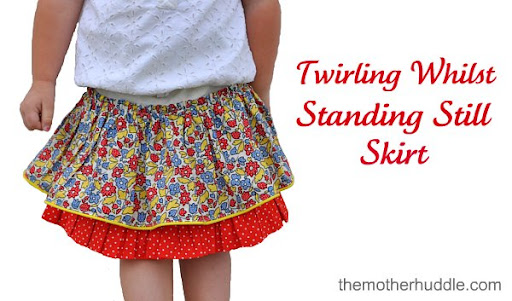
For the skirt, I pretty much followed this tutorial from The Mother Huddle, but I used 3 1/2" waist band fabric, 6" lining fabric, 7 1/2" outer skirt fabric, and 7" under skirt fabric.  I also did my own thing for the waist band so I could have a flat front to attach the bib to.

The bib is a trapezoid--I cut out 7" across the top, 5" across the bottom, and 10" high.  I made a ruffle and sandwiched it between the elephant trapezoid and the lining trapezoid and sewed them together except for the bottom edge.  Then I made a strap to go around the neck since I didn't have enough fabric left to make straps to cross in the back.  (Can you see that I haven't finished the button closure yet?)

I need to make a matching dress for Glendora, the Cabbage Patch Girl...anyone interested in a tutorial?

Friday, October 21, 2011

Corduroy Birthday Jumper

I've been spending oodles of time online trying to figure out how to make Z's birthday dress/jumper after buying fabric without a plan...we don't make it to the store that often.  So I have corduroy elephants and paisley purple corduroy that I want to make tea party worthy (doesn't sound like a great fit, but it seemed the wrong season for light weight cotton).

I have Alice in Wonderland style dress in mind, but I'm not sure I can pull it off in corduroy.  I think I'm going to make something like this skirt from The Mother Huddle blog with some slight modifications.

Hopefully, when I'm done, the yoke section won't be so long, the front will be flat, and there will be a trapezoid bib attached with criss-crossing straps in the back.  Wish me luck!

Saturday, October 15, 2011

4th Birthday Party

My 3 year old will be turning 4 soon.  We've been talking about party themes...she has wanted Olivia Pig, a Princess Tea Party, a Star and Kitty Cat, a Pizza, and a House...all in the past month.  I told her we need to be finalizing things and I think I have her convinced to have a Dolly and Me Tea Party. Oh boy, I've wanted a tea party for a long time (I probably should have done that for one of the girl's first birthday parties when they didn't have an opinion).

I've been looking at ideas online.  I like this cake from Our Scoop blog, and this cake from The Birthday Blog.  I've also seen a cake with the spout and handle made from sugar cookies.  I don't want to mess with fondant and I think I will make the cake from 2 bundt cakes instead of cooking the cakes in my mixing bowls.  I'm afraid of burning the outside to get the inside cooked.

I have a problem though...all of our family lives far away so I feed everyone lunch.  In the past I've served chili, or hot dogs, but that just doesn't seem fitting for a tea party.  Can I get any budget conscious, tea worthy ideas?

Tuesday, October 11, 2011

Fixing Mystery Holes in my Shirts

I decorated this shirt after being inspired by a tutorial Disney did at Ruffles and Stuff a while back.
But I found this in the lower center of the shirt before I washed it the other day...

I've been frustrated recently because I've had this happen to a lot of shirts in the same place.  My husband thought it was silver fish, but I thought the placement was too consistent.  I thought maybe it was from my pants rubbing on my shirts when I carried kids, but I normally carry them on my hip (I know bad for my back huh...they don't care, though and dinner still needs to be made).

I finally realized the culprit...no wonder I got a good deal on it at a garage sale.  It looked to innocent.

I fixed that shirt (well, made do at least) by catching loops from the inside of the shirt with needle and thread, but my next shirt was too far gone for that technique to work.  It needed a patch really.  I kept laying a couple strips of fabric on in different directions, but I just didn't like how it looked, and I didn't think I could pull off flowers or ruffles on top of my pant zipper. 

Then I thought of this.

I love the bird and branch silhouettes I've been seeing for a while, but I don't have the guts to put it on any of my walls.  I think I like it here.  It looks like something that I might see screen printed on a shirt.  Here are some close ups.


Monday, October 10, 2011

The Other Jacket

I finally finished my other jacket!  I used one of my 3 year old's shirts for reference, but cut my pieces about 1 inch larger because I wanted it to be able to fit over other clothes.  I cut the bottom about 2 inches below the armpit thinking I was going to make a jacket with an empire waist, but after trying it on halfway through, my daughter and I decided it should be a bolero.
I folded my material in half to cut it out to make sure it would be symmetrical. (note: I cut out two of these)

I took one and folded it in half to cut the front open and lower the neckline.

I traced the sleeve of the existing shirt to get this cutting line too, but I made sure and lined it up with the hem of the shirt I was reusing.

No pictures of the rest of the process, but it was pretty standard.  I basically did something kind of like this link from Crafterhours, but there is no ribbing to worry about.  Then I made bias tape like this tutorial from Craftiness is not Optional, and sewed it all the way around.  Finally, I made a rectangle with 2 button wholes and sewed buttons on both sides of the front opening.


My 1 year old just won't stay away with her books, and you don't want to see the 3 year old's face...well, maybe I don't want you to see her face.