Pages

Tuesday, August 30, 2011

Making a MOPs Shirt

I needed a MOPs (mothers of preschoolers) t-shirt for this morning and I had an iron on, but my friend said she was having trouble with the iron ons, so I didn't want to commit my shirt.  So I decided on an alternate route.

I put my iron-ons on some scrap knit material (which won't need to be hemmed), and cut loosely around the images.  I pinned them where I wanted them on my shirt.
I tried sewing this flower on first, but then took it off because my presser foot rubbed the transfer loose.

I went ahead and sewed the MOPs emblem on but was more careful about rubbing it with my presser foot.  Then I trimmed close to my stitching.  I still wanted some decoration (I wanted to cover up an ink stain by the armpit) so I cut out freehand circles and pinned them in place.

I attached the circles with a straight line sewn through each.  If you want less floppy dots, I would suggest sewing another line to make an X pattern.  There it is!  (Check out those arm veins I inherited.  I'm great at giving blood, but maybe I should consider posing with my arms over my head.)


Saturday, August 27, 2011

Making Chai

I like to sit down for a bit during nap time with my bible and this...
The first time I had cream in my tea I didn't like it, but I've acquired a taste for it.  Most days I use 2% milk or non-dairy creamer (I heard somewhere that putting diary in tea cancels out the antioxidants in the tea and the calcium in the milk. Anybody know if that is true?)
Something else I've acquired a taste for is chai latte.  I think it's like cappuccino for tea drinkers!  A few years ago I looked around for recipes to make my own, but didn't come up with anything that was as easy as I would have liked.  I've tweaked what I've found and came up with this recipe.
leaves from 8 tea bags (or 8 teaspoons of loose leaf tea)
2t ground ginger
2t ground cardamom
1T ground cinnamon
1/2 t ground cloves
10 pepper mill twists
Mix and store in an air tight container.  I used a baby food jar.
I found a printable from Martha Stewart for the front of the jar.
I used a little less than a teaspoon of the mix in my mesh tea diffuser for 5 minutes like I would any loose leaf tea.  Add 1t sugar and 2% milk to taste (chai buffs will tell you that whole milk or cream will mask the flavor of the spices and the sugar helps bring them out). 
Because I used preground spices there were a lot of dredges that made it through, but it settled to the bottom of my cup so it didn't bother me much.  I think it would be better if I could get a hold of whole spices and ground them myself, but I'm not sure if I could justify the cost.  I haven't done a price analysis, but I think the cardamom was probably the most expensive part I put in...I think I used about 25 cents worth.
Enjoy! and let me know if you have any suggestions.
The DIY Show Off

Thursday, August 25, 2011

Loving and Living with What I Have, Because God has Given Me Everything I Need

I've been thinking recently about stewardship and taking advantage of opportunities that God gives me to be a part of what He is doing.  Maybe a better focus for this blog is summed up by "Loving and Living with What I Have, Because God has Given Me Everything I Need."  That is a lot longer of a title than "When I Get it all Together," so maybe it makes a better subtitle.

But money isn't the only thing I have, so I hope to become a better steward of time, resources, talents, and my children too.  So I hope to:
  • spend my time on the computer and during naps more efficiently.
  • keep my house clean so I'm ready for company when I can be an encouragement to others.
  • look for oportunities to use my abilities for God's purposes.
  • be patient with my children and take advantage of time I can spend teaching and love them. 

Wednesday, August 24, 2011

Saving the Hand-Me-Downs

I L-O-V-E hand-me-downs.  It's like going of a shopping spree without spending the money!  We were given some recently.  Most were in great condition, and so cute.  Some had stains.  Honestly, I don't mind that because I hate to spend money on clothes that I plan on sending my girls out to play on the farm in.  Still, there were a couple cute dresses that I couldn't get stains out of that I wanted to rescue.

Stain #1

Stain #2

I covered stain #1 with 3 red ruffles.

Start with 3 strips of knit fabric--one longer and to of equal shorter length.

Turn them into ruffles.  You should be able to do this by setting your sewing machine to the longest stitch length and the highest tension, but for some reason, my old machine wasn't cooperating and didn't gather the material.  So, I gently pulled the bobbin thread until the looked like this. 

To center your longest ruffle, fold dress in half and line ruffle up along stitching.  Pin in place, and stitch to dress following basting. 

Position the shorter ruffles so they overlap the longer one.  Pin and stitch on basting. 

For dress #2 cut 2 strips of knit about twice as long as the pockets.


Make them ruffles like before, but this time baste 1/4" from the edge instead of the middle. 

Adjust your ruffle so it just fits on the pocket.  Pin in place under original ruffle and hand stitch. (I realized later that I could have just removed the pockets, but I liked this idea better).

Hmm...I forgot to take a picture of the whole dress, but here are the finished pockets. 

And here is dress #1 on model.  Wait, who put that little girl in that huge dress!  If the falls, she'll get tangled up in it and won't be able to get up. 

Somebody catch her before she runs out of the picture! 

Well, it will look cute later with a sweater over it, or maybe it will still fit next summer.


Monday, August 22, 2011

Headband Tutorial

Can you guess what I'm doing?  No, silly, it's not a decoration for the bloodmobile...I'm making a headband. 
Cut five teardrops out of knit material (I used a pair of children's athletic shorts).  For stability, cut a piece of grosgrain ribbon about 3x as long as your teardrops and seal the ends (I like to heat seal by holding the end next to a flame so the ribbon melts slightly, but you could also apply fray check).

Stack teardrops on top of doubled ribbon and stitch in place (I added a button but you could stitch a pretty x shape here if you prefer).

After the top is assembled sew the ribbon to your headband (I used the cuff from the shorts I made the teardrops out of) in at least 2 spots where the stitches will be hidden underneath the teardrops.

You could use hot glue to assemble, but I have a 1 year old that puts everything in her mouth, so I sewed to be safe.  I used knit fabric from a pair of children's shorts so I didn't finish the edges of my teardrop pieces.

And there she goes...boy is it hard to get a toddler to pose!


The headband I made is to go with this dress.  As you can see, it has a stain on the front.  Later this week, I'll show you how I covered the stain.
Keeping It Simple

Thursday, August 18, 2011

Teachable Moments

This isn't a picture to show you my 2 cute ragamuffins in their play clothes.
It is a picture to show you how big our truck is.  Z obviously isn't tall enough to get into the truck by herself, and I'm not tall myself.  So whenever the girls and I are out and about by ourselves, I have to hold the baby in one arm and hoist the 3 year old into the back seat with the other.  I'm sure it's quite entertaining.

It's not ideal, but at least both the car seats fit in it, as opposed to our little Ford Escort.  I would like our family vehicle should be a larger car that still gets good gas mileage, but my husband thinks we should get a diesel Excursion (he has a thing against small cars).  Our 3 year old thinks we should have a mini van, but she calls my mom's SUV a van, so I'm not sure what she has in mind.

Z has been asking some time now if/when we can get a mini van.  We've told her that we don't know...maybe she should ask God.

So the other day she says, "Mommy, how would God give us a mini van?"  I thought I encourage her curiosity by answering and use the teachable moment as I went on to explain how sometimes God gives us different opportunities to earn money or find good deals.

Of course, she already had something else in mind.  She said, "I think God ties a big rope around it and lowers it down." 

I replied, "That would take a really big rope." 

"Why?" she asks. 

"Because vans are very heavy," I say, "That's not how God normally does things...but, He could if He wanted to." 

And so it turned out to be a teachable moment for me too, as God reminded me that He on occasion has done supernatural things, and He is powerful enough to take care of us.  Right now He is taking care of us in our large pick up, but look out for falling vans.

Tuesday, August 16, 2011

Shirt to Dress Tutorial

I'm excited to say that this post has been featured at Whipup!

Able to leap over (and pick up) a room full of toys in a single bound, faster than a speeding toddler, stronger (willed) than a preschooler, it's...supermom.  Well, we can pretend.  I hated to throw away the collar and cuffs that I cut off of the ($1) xxl shirt I used to make this, but they make good dress up props while I'm thinking of what I'm really going to use them for.
This is my first tutorial, and you will probably have to have a little bit of sewing knowledge to follow some of it.  My mom taught me to sew when I was in school and we made wool suits, but until recently I wouldn't have tried to figure out how to make something like this without a pattern. After spending some time on blogs online I'm feeling a little braver about improvising.  So I hope you will get some ideas from this about how to do some improvising of your own.


First I cut off the sleeves and shoulders while the shirt was inside out.
Cut off the cuffs and down the underarm seem.

I knew I wanted to gather a bit at the top of the skirt, so I drew straight chalk line from the top to the bottom of the sides (note: shirt is inside out and folded in half for uniform sides).  I made sure when I cut the sides off I ended my cut tapered off above the hem so I wouldn't have a bunch of bulk there later.  I don't look good in a tent though, so I should have made the top of the shirt more narrow with a greater angle (had to fix it later).  I would suggest making the top a couple inches bigger than your rib cage, curve through a couple inches more than your waste and on to the outside bottom corner of the shirt.  (Remember you will need to divide circumference by 4 if you have your shirt laid out like I do).

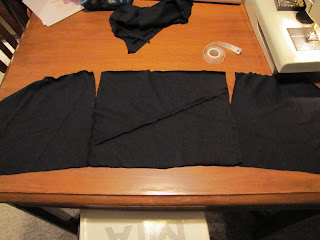
Here are my dimensions for the front.  Cut out 2.  I measured from my shoulder to under my bust at my armpit.  If you want your waist band to hit a little lower than mine, make sure and measure vertically through the largest part of your bust.
I cut this part from my sleeves.  I barely had enough material.  Or you could use a second shirt.

Turn one of the sleeve leftovers over so they are stacked like this.

Then, cut off the extra and pin and stitch.

Open it up and cut out 1 back rectangle.  It should be the same height as your front pieces and as wide as your shoulders.  (You should probably have someone else take this measurement.  I didn't and couldn't straighten my shoulders at the same time and ended up having to add some fabric later.

Sew fronts to back at sides from bottom to 4" up with right side together.  I'm not sure if this is a universal measurement.  You should measure from your armpit to the bottom of your bra line to see what your measurement should be. 

Baste top of front pieces as well as 1/4 to 1/2 in on bottom. (The bottom of my front pieces was 18" so I measured in to 4 1/2" and 9" and basted between those points.)

Measure in 4" on both sides of your back and mark.

Gather front shoulders to match marked points on back and stitch with right sides together.  Then try it on and play around with the gathers at the bust and overlapping the flaps so it fits right.  I folded my inside points over at this point as you can see.  I could have just cut it off, but I liked the way it looked and thought it might add some stability.


Sew up the sides of your skirt piece and baste the front and them the back (so you can adjust from both sides).  With the skirt inside out and the top right side out, slide the top into the skirt so the waist is even.  Gather the skirt to match the top, pin and stitch with a zig zag (It doesn't have to be a big zig zag, but you have to allow for some give so you don't bust the thread when you put your dress on.  It's okay if the basting busts after you have it all put together though).

Turn the whole dress right side out and shirr.  If you aren't familiar with shirring (your are missing out) here's a tutorial!  I used my presser foot as a guide to space my stitching.

Here is my dress after I shirred and discovered it was too tent-like.  You can see the chalk line that I sewed over and then folded the dress in half vertically and cut off the excess and sewed up the other side.

And here you can see where I fixed my mistake of too narrow of a back piece.

We've waited until this point to cut out the curve of the arm wholes because I was worried about cutting too much out at the sacrifice of modesty.  But the arms are awkward without the curve so wiggle into your dress and fold your material around until you figure out how much to cut out.  I only cut the front because my "fixing" made a natural curve in the back, but you will probably be most comfortable if you cut both sides.  Don't cut through your stitching lines though or your seems will pull apart.

Ta da!  Okay, I'm not completely comfortable with this picture, but it was the least embarrassing.  Very comfy dress!!


   ThriftyThurs Thrifty Thursday Week 36