Pages

Showing posts with label clothes. Show all posts

Monday, September 17, 2012

Repunzel Doll and Boy Shirts

I normally end up making hair bows for my niece for her birthdays, but I've been wanting to make a Black Apple doll for some time.  I wanted to make Repunzel, but wasn't sure how to make long hair hang down in the back.  After asking around, a friend suggested a wig, and I kind of like how it turned out.


Now she can be long haired Repunzel, or Repunzel with a hair cut.

 
And why not make a market skirt (minus the pockets) for the birthday girl to match her doll?
 
I've also been wanting to make a machine embroidered shirt using this technique.
 
It turned out to be harder than I expected.  Even with the stabilizer, the fabric shifted on me a lot.

 
This was a little easier.  I sewed diamond shaped t-shirt material onto the shirt and stitched stripes on top to make an argyle pattern.

 
It's hard to come up with ideas for handmade boy gifts...I can't imagine that clothes are really that exciting of a present.
 
I'd love suggestions for next years gift for a 9 year old boy.

Monday, July 16, 2012

When I go Thrifting

I'm going to have a good opportunity to go thrifting in a week, so I've been looking for some inspiration for repurposing projects.  Here's what I found at Old Navy.


And maybe I'll to put together a Milk Maid Skirt from Crafterhours.

So I'll be looking for gauze like material, chambre, large men's button ups, lightweight jersy and lightwight cotton...actually, I should probably look through my stash of already thrifted materials first...but I'd really like to get a hold of some chambre or linen material.

Friday, October 21, 2011

Corduroy Birthday Jumper

I've been spending oodles of time online trying to figure out how to make Z's birthday dress/jumper after buying fabric without a plan...we don't make it to the store that often.  So I have corduroy elephants and paisley purple corduroy that I want to make tea party worthy (doesn't sound like a great fit, but it seemed the wrong season for light weight cotton).

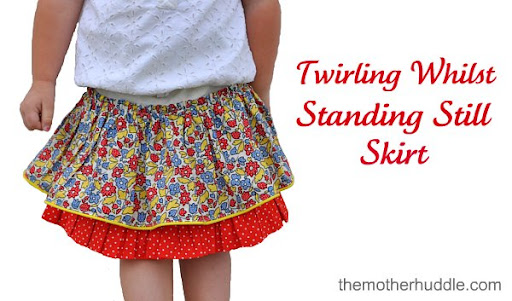
I have Alice in Wonderland style dress in mind, but I'm not sure I can pull it off in corduroy.  I think I'm going to make something like this skirt from The Mother Huddle blog with some slight modifications.

Hopefully, when I'm done, the yoke section won't be so long, the front will be flat, and there will be a trapezoid bib attached with criss-crossing straps in the back.  Wish me luck!

Tuesday, October 11, 2011

Fixing Mystery Holes in my Shirts

I decorated this shirt after being inspired by a tutorial Disney did at Ruffles and Stuff a while back.
But I found this in the lower center of the shirt before I washed it the other day...

I've been frustrated recently because I've had this happen to a lot of shirts in the same place.  My husband thought it was silver fish, but I thought the placement was too consistent.  I thought maybe it was from my pants rubbing on my shirts when I carried kids, but I normally carry them on my hip (I know bad for my back huh...they don't care, though and dinner still needs to be made).

I finally realized the culprit...no wonder I got a good deal on it at a garage sale.  It looked to innocent.

I fixed that shirt (well, made do at least) by catching loops from the inside of the shirt with needle and thread, but my next shirt was too far gone for that technique to work.  It needed a patch really.  I kept laying a couple strips of fabric on in different directions, but I just didn't like how it looked, and I didn't think I could pull off flowers or ruffles on top of my pant zipper. 

Then I thought of this.

I love the bird and branch silhouettes I've been seeing for a while, but I don't have the guts to put it on any of my walls.  I think I like it here.  It looks like something that I might see screen printed on a shirt.  Here are some close ups.


Monday, October 10, 2011

The Other Jacket

I finally finished my other jacket!  I used one of my 3 year old's shirts for reference, but cut my pieces about 1 inch larger because I wanted it to be able to fit over other clothes.  I cut the bottom about 2 inches below the armpit thinking I was going to make a jacket with an empire waist, but after trying it on halfway through, my daughter and I decided it should be a bolero.
I folded my material in half to cut it out to make sure it would be symmetrical. (note: I cut out two of these)

I took one and folded it in half to cut the front open and lower the neckline.

I traced the sleeve of the existing shirt to get this cutting line too, but I made sure and lined it up with the hem of the shirt I was reusing.

No pictures of the rest of the process, but it was pretty standard.  I basically did something kind of like this link from Crafterhours, but there is no ribbing to worry about.  Then I made bias tape like this tutorial from Craftiness is not Optional, and sewed it all the way around.  Finally, I made a rectangle with 2 button wholes and sewed buttons on both sides of the front opening.


My 1 year old just won't stay away with her books, and you don't want to see the 3 year old's face...well, maybe I don't want you to see her face.

Sunday, September 18, 2011

Cardigan #1


I finally finished the first cardigan I started here.  I took the long folded fabric from the mentioned post They are 3" wide and as long as the cardigan front) and folded the ends of the fabric inside, then sewed the long sides closed with the openings of the cardigan sandwiched inside.

Then I cut 2 rectangles of fabric twice as long as the sleeve openings are around and 3" wide.  I sewed the short ends together to make tubes, then fold the tube in half with wrong sides together and zig zagged the raw edges.
 
After that, I basted beside the zig zag and gathered to match the sleeve openings.

With my sleeves turned inside out and folded to the right length, I pinned the ruffles on the current outside of the sleeve and zig zagged in place to allow some give.  Then I trimmed off the extra material that was turned up.

The circles are cut from my material and scrap from the sweater that I finished with frey check, and attached with a few crossing rows of zig zags.

Wednesday, September 14, 2011

Beginning a Cardigan

I started one of my cardigans that I mentioned in my last post.  The first is made from one of my pull over sweaters. 

I traced a shirt that fits my 3 year old onto a big piece of brown paper.  If you want yours to fit over bulkier  clothes don't for get to make your pattern a little bigger than a normal fitting shirt.  I  also folded the pattern in half and trimmed/added so it was symmetrical.

Then I pinned the pattern directly onto my inside out sweater making sure to match up the collar.  Then I sewed along the pattern.  I found that this made the fabric more stable without leaving anything that would need to be torn away later.  I wanted a long cardigan, so I gradually angled my stitching line from the waist of the shirt pattern out to the lower corners of the existing sweater.  I also wasn't sure what I wanted to do abut cuffs, so I continued sewing past my sleeve patterns to the end of the sweater sleeves.
 
Now we have a long sweater with long sleeves.  Next I folded the sweater in half and cut all the way up the front.

I tried using an iron on adhesive to finish the raw edges in front.  Here I ironed it on the edge and am removing the backing.

But when I tried to fold it over and iron it in place, it just wouldn't take.  I think it had to do with the weight of the fabric and the low temperature of the iron, but I was afraid to turn it up because the sweater is acrylic.

So I fixed it with this material that I cut and folded kind of like bias tape (but I didn't cut on the bias).

I'll have to save embellishments for another day.  In the mean time, anyone have an idea what to do with the sleeves that I still have folded up like I did in the picture above?

Monday, September 12, 2011

Cardigan Ideas

My 3 year old needs something to wear over her sleeveless dresses.  I've been doing some looking around and I think I'm going to make a couple out of a white t-shirt and a grey pull-over sweater using these techniques.  Both have tutorials on their blogs.

from Shwin & Shwin

from i Candy handmade

Thursday, September 1, 2011

Shrinking My Shirt

I ordered some shirts from jcpenney's after my youngest daughter was born thinking I would need a medium, but they were too big (I wish women's sizes were more standard).

One shirt originally had a neckline that looked kind of like this.
a.n.a® Pleated Banded Bottom Top


I cut the collar off, shirred 5 rows all the way around the neck and sewed the collar on to the front of the shirt with a straight stitch and now it looks like this.

Tuesday, August 30, 2011

Making a MOPs Shirt

I needed a MOPs (mothers of preschoolers) t-shirt for this morning and I had an iron on, but my friend said she was having trouble with the iron ons, so I didn't want to commit my shirt.  So I decided on an alternate route.

I put my iron-ons on some scrap knit material (which won't need to be hemmed), and cut loosely around the images.  I pinned them where I wanted them on my shirt.
I tried sewing this flower on first, but then took it off because my presser foot rubbed the transfer loose.

I went ahead and sewed the MOPs emblem on but was more careful about rubbing it with my presser foot.  Then I trimmed close to my stitching.  I still wanted some decoration (I wanted to cover up an ink stain by the armpit) so I cut out freehand circles and pinned them in place.

I attached the circles with a straight line sewn through each.  If you want less floppy dots, I would suggest sewing another line to make an X pattern.  There it is!  (Check out those arm veins I inherited.  I'm great at giving blood, but maybe I should consider posing with my arms over my head.)


Wednesday, August 24, 2011

Saving the Hand-Me-Downs

I L-O-V-E hand-me-downs.  It's like going of a shopping spree without spending the money!  We were given some recently.  Most were in great condition, and so cute.  Some had stains.  Honestly, I don't mind that because I hate to spend money on clothes that I plan on sending my girls out to play on the farm in.  Still, there were a couple cute dresses that I couldn't get stains out of that I wanted to rescue.

Stain #1

Stain #2

I covered stain #1 with 3 red ruffles.

Start with 3 strips of knit fabric--one longer and to of equal shorter length.

Turn them into ruffles.  You should be able to do this by setting your sewing machine to the longest stitch length and the highest tension, but for some reason, my old machine wasn't cooperating and didn't gather the material.  So, I gently pulled the bobbin thread until the looked like this. 

To center your longest ruffle, fold dress in half and line ruffle up along stitching.  Pin in place, and stitch to dress following basting. 

Position the shorter ruffles so they overlap the longer one.  Pin and stitch on basting. 

For dress #2 cut 2 strips of knit about twice as long as the pockets.


Make them ruffles like before, but this time baste 1/4" from the edge instead of the middle. 

Adjust your ruffle so it just fits on the pocket.  Pin in place under original ruffle and hand stitch. (I realized later that I could have just removed the pockets, but I liked this idea better).

Hmm...I forgot to take a picture of the whole dress, but here are the finished pockets. 

And here is dress #1 on model.  Wait, who put that little girl in that huge dress!  If the falls, she'll get tangled up in it and won't be able to get up. 

Somebody catch her before she runs out of the picture! 

Well, it will look cute later with a sweater over it, or maybe it will still fit next summer.